Keep your existing tasks.
Save and close your Lesson 3 working file, then back it up. Continue in a working copy. The starting download includes the three dated practice tasks and Follow-up List. The example adds Contact Actions and four scripts; it does not add practice tasks or mark anything Done for you.
Your outcome
A New follow-up button that enters the blank portal row, and a Mark done button on each row that updates that task. Empty-row and save failures produce a useful message.
The new-task button prepares entry; it does not create an incomplete record by itself. You still enter Task, DueDate and Status. The relationship supplies ContactID when you type in the blank row.
1. Prepare Contact Actions.
- In File → Manage → Layouts, duplicate Contact Follow-ups as Contact Actions. Keep it based on Contacts and use Form View.
- In Layout mode, select the portal. In the Inspector’s Position tab, give the object the exact name FollowUps portal, without quotes. This is its object name, not the table name.
- Keep the portal based on FollowUps, with three visible rows, vertical scrolling, no filter and no sort. Keep related-record creation enabled on FollowUps only.
- Widen the layout and portal enough to leave room for a Mark done button to the right of Status. Keep Task, DueDate, Status and the button fully inside the first portal row. Extend the Body part for a New follow-up button below the portal.
- Keep the existing Contact Follow-ups layout unchanged so you can compare the two.
2. Prepare the next blank row.
Open Scripts → Script Workspace. Create folders Follow-ups UI and Follow-ups Controller. Keep all four new scripts out of the Scripts menu; buttons will call them. Add the steps below individually in Script Workspace. The listings show settings, not text to paste as a single calculation.
Create Follow-ups | Prepare Entry in the Controller folder. It checks context, saves any current entry, selects the named portal and moves to its final blank row. A nonempty task key means the row is an existing task, so the script stops.
FileMaker script
# PURPOSE: Enter the blank FollowUps portal row without creating an incomplete task.
# HISTORY: 2026-OCT-07    Plato    Create Course 2 Lesson 4 example.
If [ Get ( WindowMode ) ≠ 0 or Get ( LayoutName ) ≠ "Contact Actions" ]
    Exit Script [ "Use Browse mode on Contact Actions." ]
End If
If [ IsEmpty ( Contacts::PrimaryKey ) ]
    Exit Script [ "Choose an existing contact first." ]
End If
Commit Records/Requests [ With dialog: Off ; Skip data entry validation: Off ]
If [ Get ( LastError ) ≠ 0 ]
    Exit Script [ "Finish the current entry before adding another follow-up." ]
End If
Go to Object [ Object Name: "FollowUps portal" ]
If [ Get ( LastError ) ≠ 0 ]
    Exit Script [ "The FollowUps portal could not be selected." ]
End If
Go to Portal Row [ Select: Off ; Last ]
If [ Get ( LastError ) ≠ 0 ]
    Exit Script [ "The last portal row could not be selected." ]
End If
If [ not IsEmpty ( FollowUps::PrimaryKey ) ]
    Exit Script [ "No blank entry row is available. Check related-record creation." ]
End If
Go to Field [ Select/perform ; FollowUps::Task ]
If [ Get ( LastError ) ≠ 0 ]
    Exit Script [ "Click Task in the blank portal row to begin." ]
End If
Exit Script [ "" ]
For Go to Object, enter "FollowUps portal" as the object-name calculation. For Go to Field, select FollowUps::Task directly. Leave “Skip data entry validation” off in Commit Records/Requests. Read Get ( LastError ) immediately after each operation; another step can replace it.
Create Follow-ups | New Follow-up Button Pressed in the UI folder:
FileMaker script
# PURPOSE: Run the action and show any returned message.
# HISTORY: 2026-OCT-07    Plato    Create Course 2 Lesson 4 example.
Set Error Capture [ On ]
Allow User Abort [ Off ]
Perform Script [ "Follow-ups | Prepare Entry" ]
If [ Get ( ScriptResult ) ≠ "" ]
    Show Custom Dialog [ "New follow-up" ; Get ( ScriptResult ) ]
End If
In Show Custom Dialog, use one OK button, no input fields, and leave commit data off. The controller returns an empty string on success or a message on failure. The UI script displays that message. Set Error Capture makes the script responsible for explaining errors while it runs.
3. Complete the clicked task.
Create Follow-ups | Mark Done in the Controller folder. The button will be inside the task row, so this script uses that active portal row. Do not add navigation, Go to Object or a commit before Set Field: those steps can lose the clicked row context.
FileMaker script
# PURPOSE: Mark only the clicked existing portal task Done and commit it.
# HISTORY: 2026-OCT-07    Plato    Create Course 2 Lesson 4 example.
If [ Get ( WindowMode ) ≠ 0 or Get ( LayoutName ) ≠ "Contact Actions" ]
    Exit Script [ "Use Browse mode on Contact Actions." ]
End If
If [ Get ( ActivePortalRowNumber ) = 0 or IsEmpty ( FollowUps::PrimaryKey ) ]
    Exit Script [ "Choose Mark done on an existing task, not the blank row." ]
End If
Set Field [ FollowUps::Status ; "Done" ]
If [ Get ( LastError ) ≠ 0 ]
    Exit Script [ "The task could not be changed. It may be locked or unavailable." ]
End If
Commit Records/Requests [ With dialog: Off ; Skip data entry validation: Off ]
If [ Get ( LastError ) ≠ 0 ]
    Exit Script [ "The change could not be saved. Correct the task, due date or other invalid entry, then commit again. Do not assume it is saved yet." ]
End If
Exit Script [ "" ]
Select FollowUps::Status as the Set Field target and use "Done" as its result. The blank row has no PrimaryKey, so the script rejects it. It does not delete the task or change ContactStatus. Repeating the action on an already completed task leaves it Done.
Create Follow-ups | Mark Done Button Pressed in the UI folder:
FileMaker script
# PURPOSE: Run the action and show any returned message.
# HISTORY: 2026-OCT-07    Plato    Create Course 2 Lesson 4 example.
Set Error Capture [ On ]
Allow User Abort [ Off ]
Perform Script [ "Follow-ups | Mark Done" ]
If [ Get ( ScriptResult ) ≠ "" ]
    Show Custom Dialog [ "Mark done" ; Get ( ScriptResult ) ]
End If
Again, use a single OK button with no input fields or commit option. If a save fails, the field may already display Done while the record is still uncommitted. Correct the invalid entry and commit again before assuming it was saved.
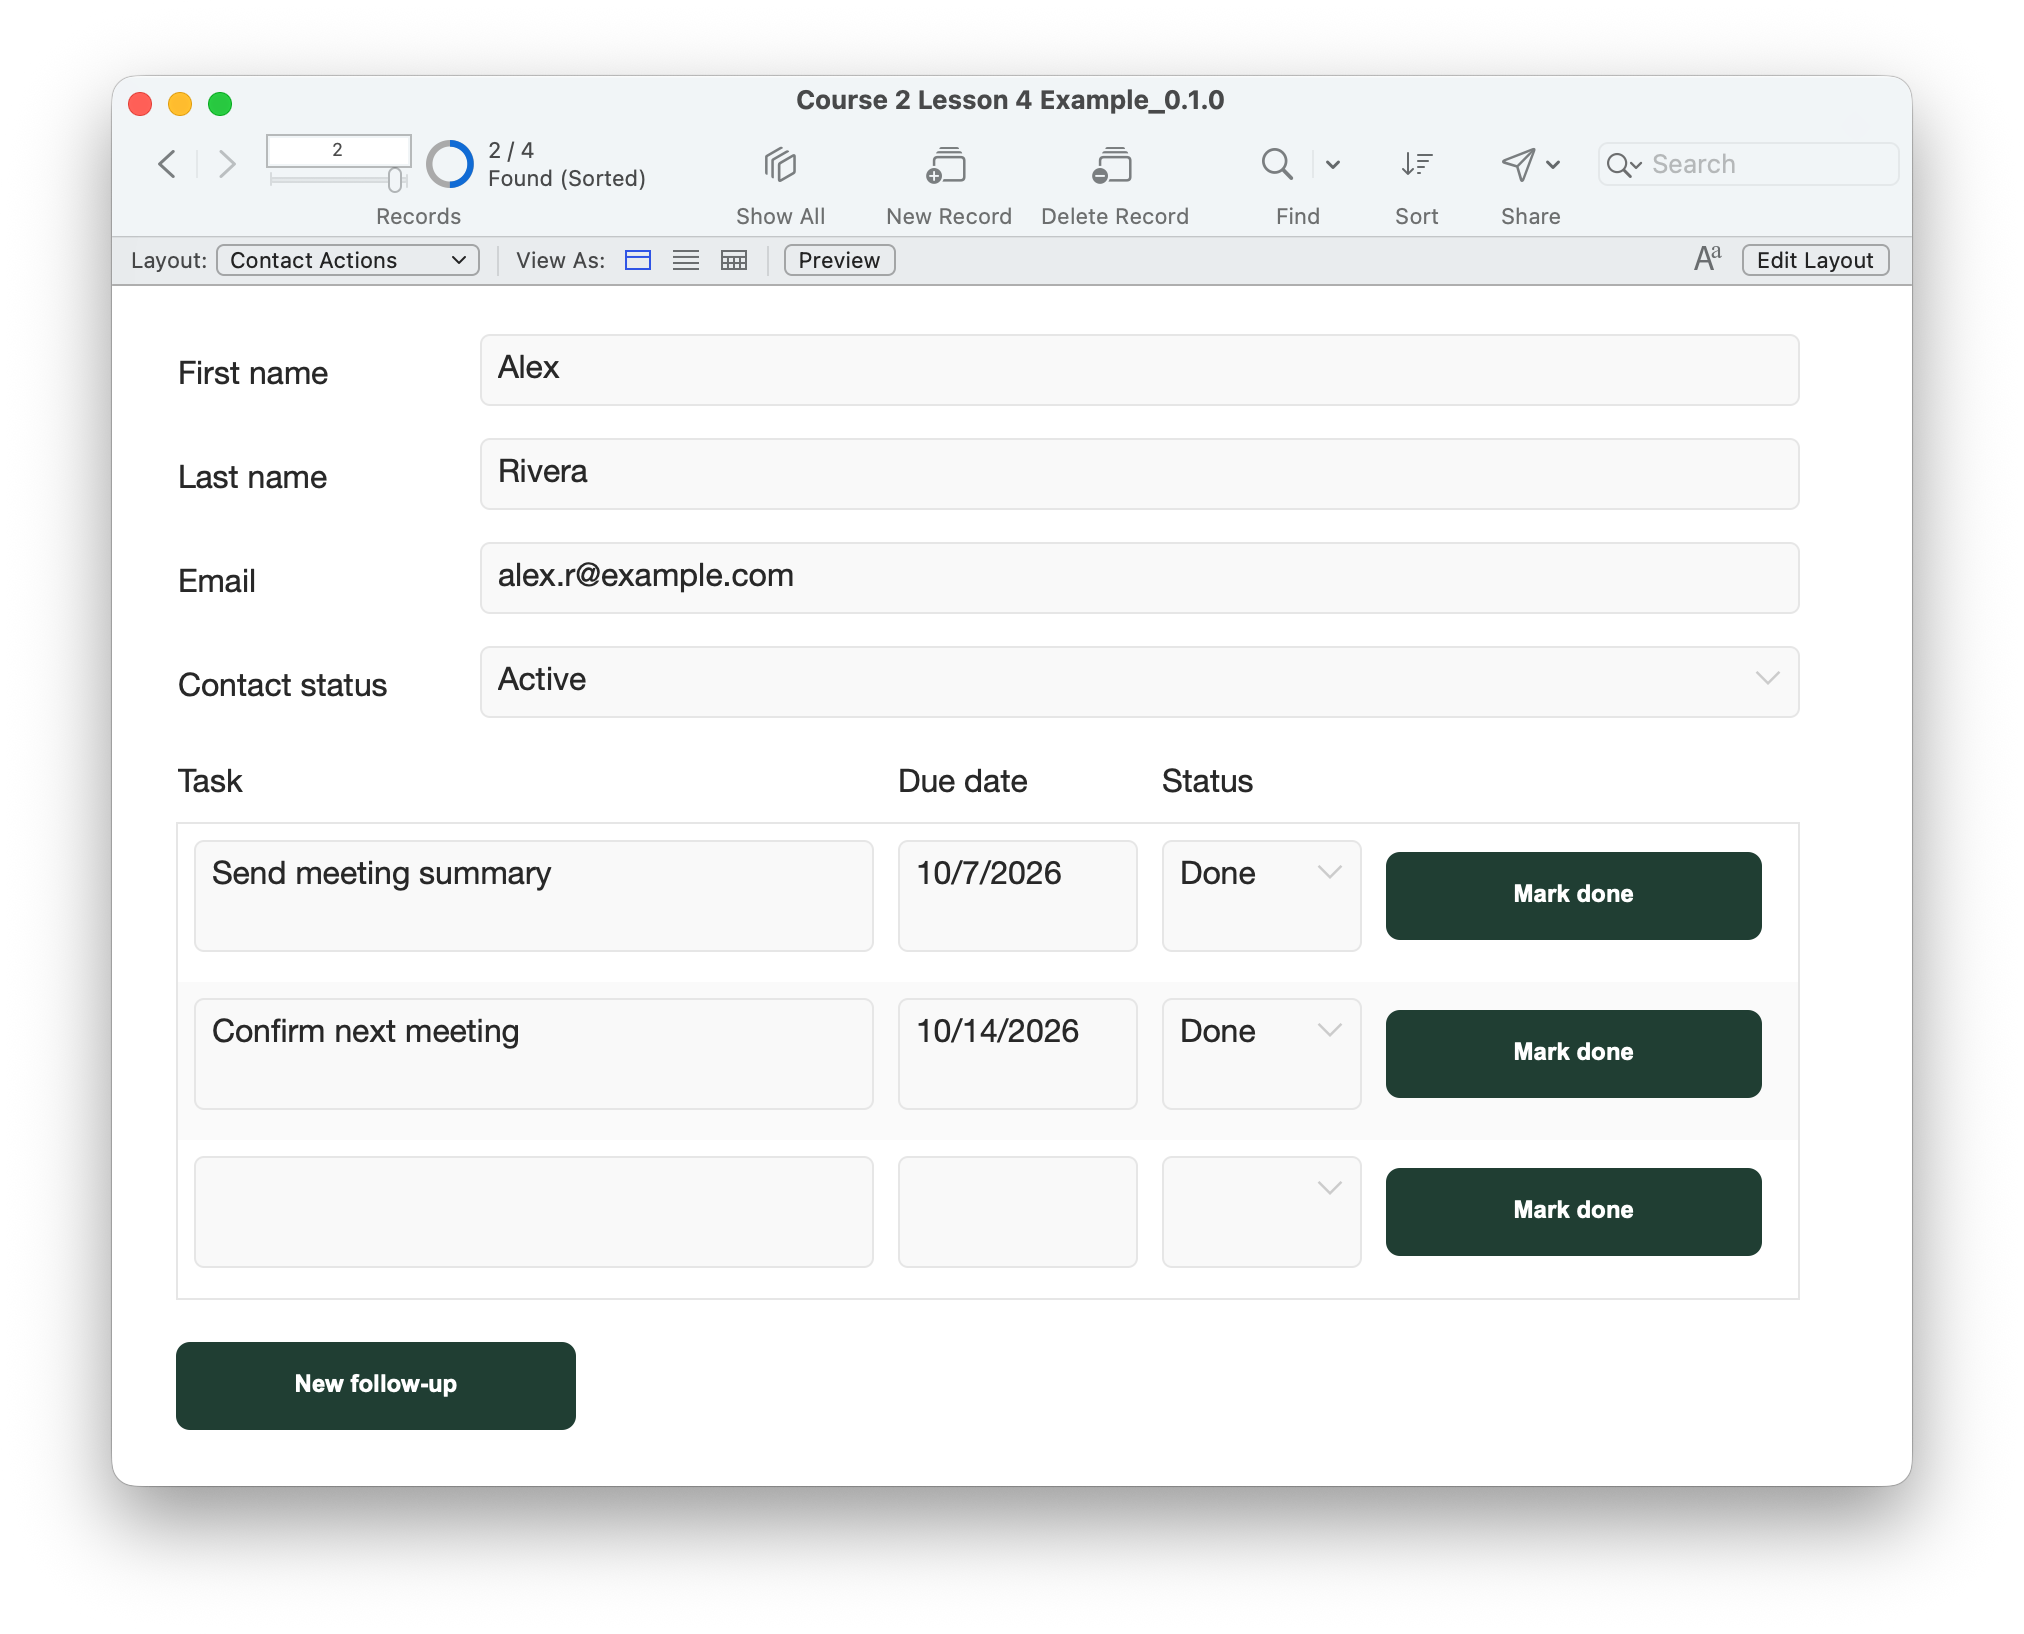
Try it yourself.
- On Contact Actions, choose Alex Rivera. Click New follow-up. Confirm focus moves to the blank Task field and no task is created until you type.
- Enter Send revised agenda, a due date of tomorrow and Status Open. Commit it. Check it appears for Rivera, not Morgan, and the contact count stays unchanged.
- Click Mark done on Send revised agenda. Confirm only that task becomes Done. Rivera’s other tasks and Contact status should be unchanged.
- Click Mark done again on the same task. It should remain Done without creating another task.
- Click Mark done on the blank row. Expect a message; dismiss it and confirm no extra task was created.
- In your practice copy, begin another task but leave DueDate empty, then click New follow-up. Expect the save to stop. Fill a valid due date and Open status, commit, then try again.
- On Follow-up List, rerun the Open find. Completed tasks should be excluded. Return to Contact Actions, close and reopen the file, and confirm the task links and Done status persist.
Compare your result
New follow-up selects the entry row. Typing creates the related task. Mark done changes only the clicked existing task and commits it. A blank row is rejected. Creating tasks does not increase the Contacts count. Invalid entries must be corrected before continuing.
Check your understanding.
Choose one answer for every question. Answers and scores stay in this page.
Next: see your workload.
Lesson 5 builds an overview using lists, sorting and summaries. Keep the tasks you created and completed.
Return to the course outline ↗