Keep the project growing.
Continue with your Course 2 Lesson 1 working file. Close it and make a backup before changing its structure. Keep the Contacts and Notes tables, their relationship and your existing records.
The starting download is a saved Lesson 1 example, including Alex Rivera’s Active contact status. The completed example adds the FollowUps structure and layout; its FollowUps table starts empty. Enter the practice tasks yourself.
Your outcome
A Contact Follow-ups layout that shows one contact and that contact’s tasks. You can enter multiple tasks, set due dates and mark a task Done without changing the contact’s own status.
One contact can have many notes and many follow-ups. Keep those as separate related tables. Avoid Task1, Task2 and Task3 fields in Contacts: each new task should be a record, not a new field.
1. Define one task per record.
Choose File → Manage → Database → Tables and create FollowUps. Keep FileMaker’s five default fields, including the automatically generated PrimaryKey. On the Fields tab, select FollowUps and add:
| Field | Type | Purpose |
|---|---|---|
| ContactID | Text | The parent contact’s PrimaryKey |
| Task | Text | A specific next action |
| DueDate | Date | When the action is due |
| Status | Text | Open or Done |
FollowUps now has nine fields. Its PrimaryKey identifies the task. ContactID identifies the contact it belongs to, so the same ContactID may occur in several task records. Do not make ContactID unique or give it a new UUID auto-entry calculation.
2. Make each task usable.
Choose File → Manage → Value Lists. Create Follow-up statuses using custom values Open and Done, one per line. This is a different list from Contact statuses.
In Manage Database, open each field’s Validation options. For Task, DueDate and Status, choose Only during data entry, clear user override, and select Not empty. Add these specific options and custom messages:
| Field | Additional rule | Custom message text |
|---|---|---|
| Task | No additional rule | Enter a task for this follow-up. |
| DueDate | Strict data type: 4-Digit Year Date | Enter a valid due date with a four-digit year. |
| Status | Member of value list: Follow-up statuses | Choose Open or Done for this follow-up. |
For each custom message, enter its text in double quotes in Specify Calculation, just as in Lesson 1. Leave auto-entry defaults off; the learner will explicitly choose Open when entering a task. Save the field options.
Keep ContactID as an ordinary Text field. The relationship fills it when you create a task through the portal. Do not type or edit primary keys in the exercise.
3. Link the task to its contact.
- Open the Relationships tab. Locate Contacts and FollowUps.
- Drag Contacts::PrimaryKey to FollowUps::ContactID. Use an equality relationship.
- Double-click the relationship line. On the FollowUps side only, enable Allow creation of records in this table via this relationship.
- Leave related-record deletion off on both sides. Leave creation off on the Contacts side. Save the database changes.
Alex Rivera and Alex Morgan have different PrimaryKey values. A follow-up for Rivera must use Rivera’s key, even though both contacts share a first name.
4. Put tasks beside the contact.
- In File → Manage → Layouts, duplicate Contact Details as Contact Follow-ups. Keep the layout based on Contacts.
- Enter Layout mode. Arrange the four contact fields near the top and extend the Body part to leave room below them.
- Add three labels beneath the contact fields: Task, Due date and Status. Make the Task column widest.
- Draw a portal below these headings. In Portal Setup, select FollowUps for Show records from. Start at row 1, show three rows and allow vertical scrolling. Leave portal filtering, sorting and deletion off for this lesson.
- Add FollowUps::Task, FollowUps::DueDate and FollowUps::Status to the portal. All three field objects must fit entirely inside its first row. Use two lines of height for Task if needed.
- Make Task and DueDate Edit Boxes. Format the date clearly with a four-digit year. Make Status a Pop-up Menu using Follow-up statuses; leave other-value and list-editing options off.
- Set tab order through the contact fields, then Task, DueDate and Status. Return to Browse mode, save, and use Form View.
The empty entry row is where you add a task. Fill its three fields before clicking blank layout space to commit. The portal’s relationship supplies ContactID automatically.
If the entry row is missing
Check that Contact Follow-ups is based on Contacts, the portal shows FollowUps, and related creation is enabled on the FollowUps side. Confirm the current contact has its existing PrimaryKey. Do not change security privileges or turn on sharing to solve a portal setup problem.
Try it yourself.
Use your local date format with a four-digit year. Choose dates relative to the day you do the lesson, so the next lesson has useful examples.
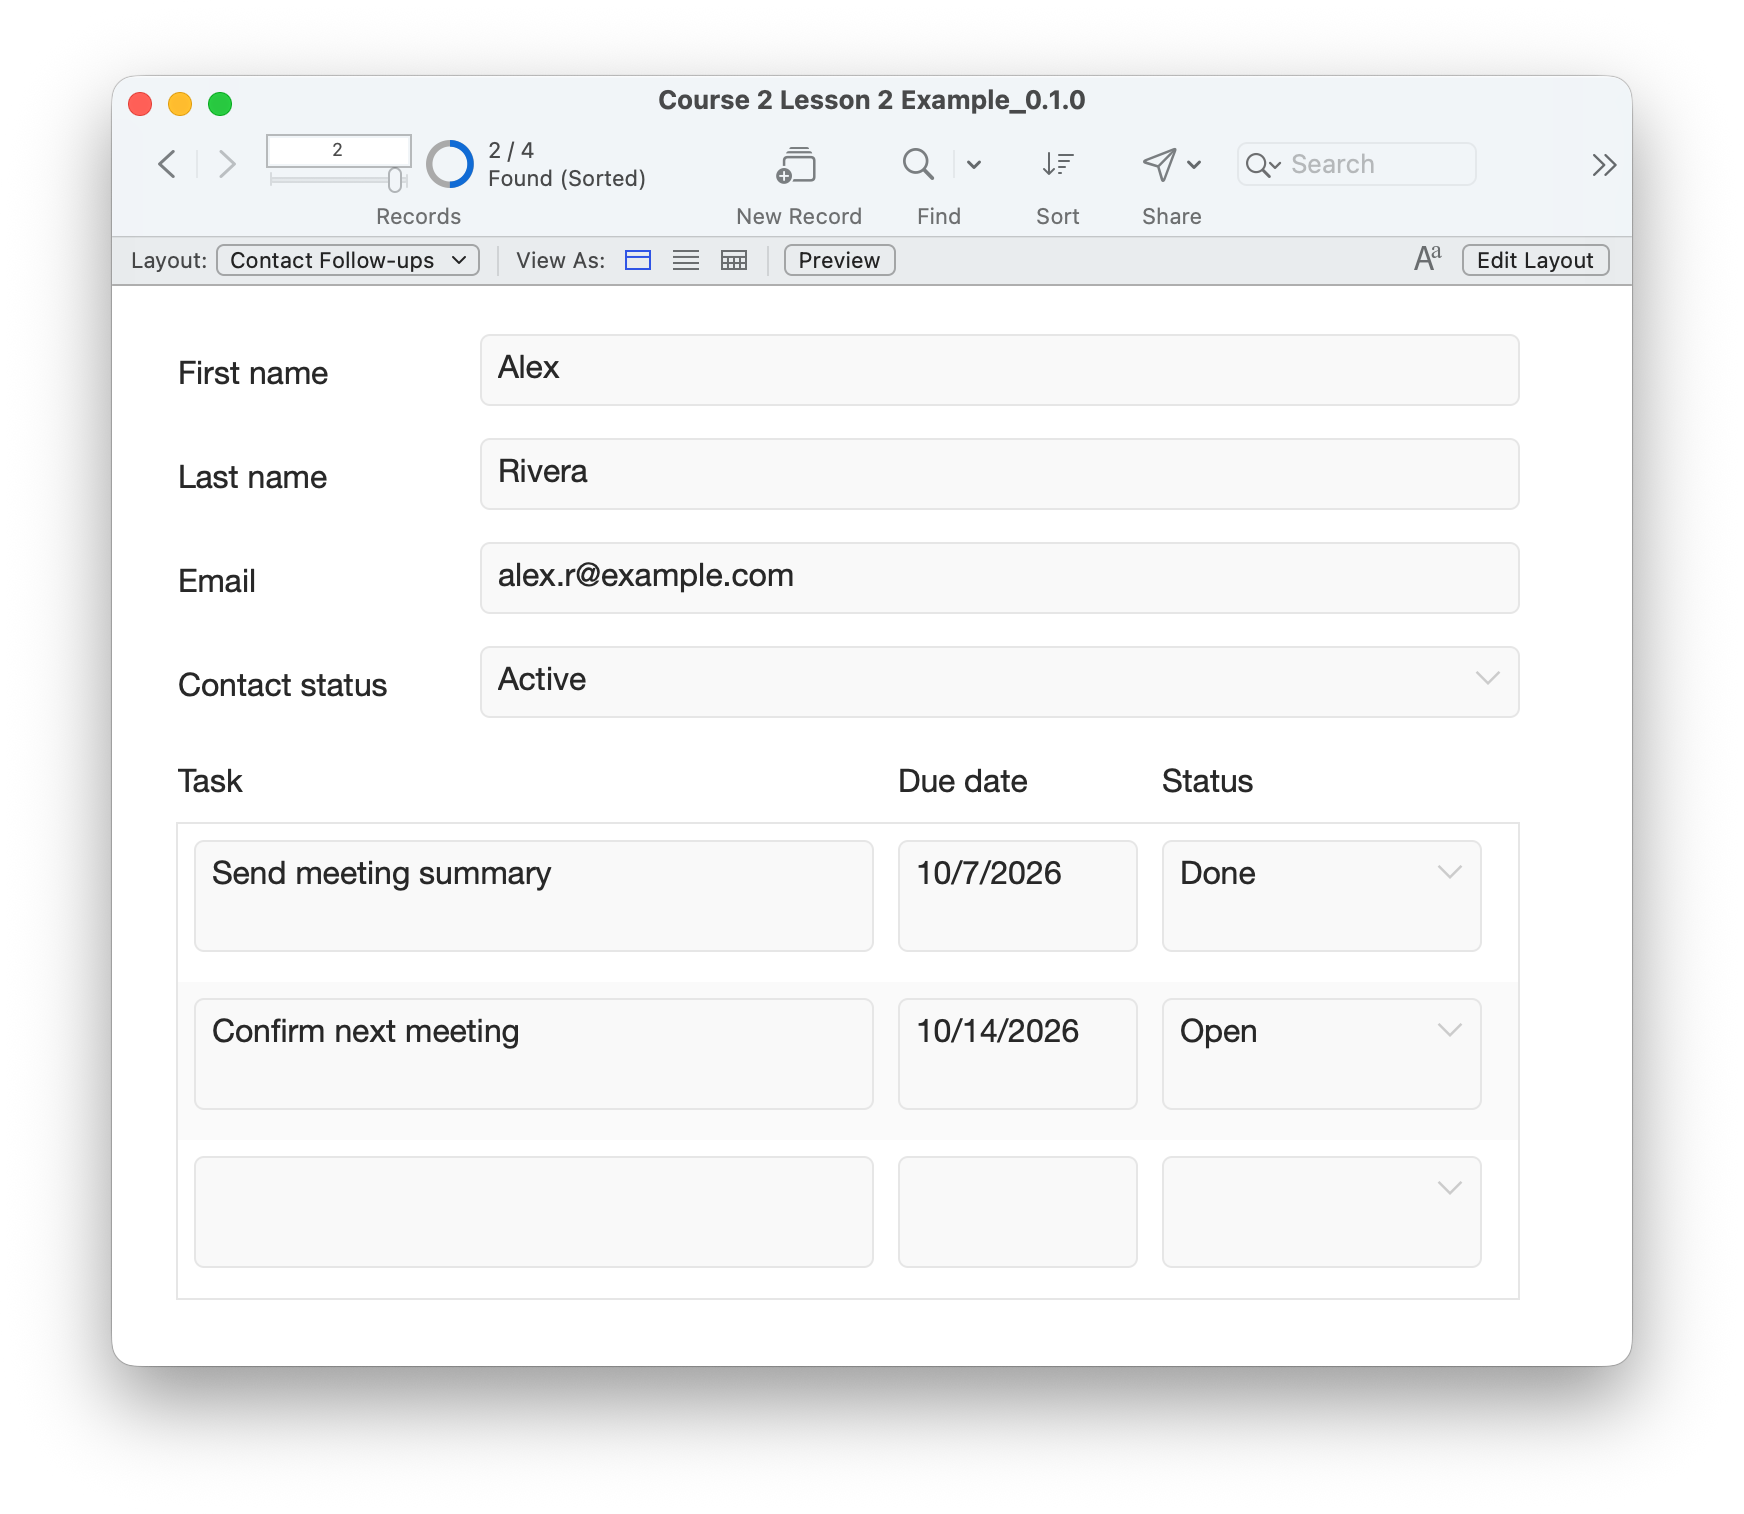
- Show all contact records and find Alex Rivera. In the first blank portal row, enter Send meeting summary, a due date of today, and Status Open. Commit the record.
- In the next blank row, enter Confirm next meeting, a date seven days from today, and Open. Commit again.
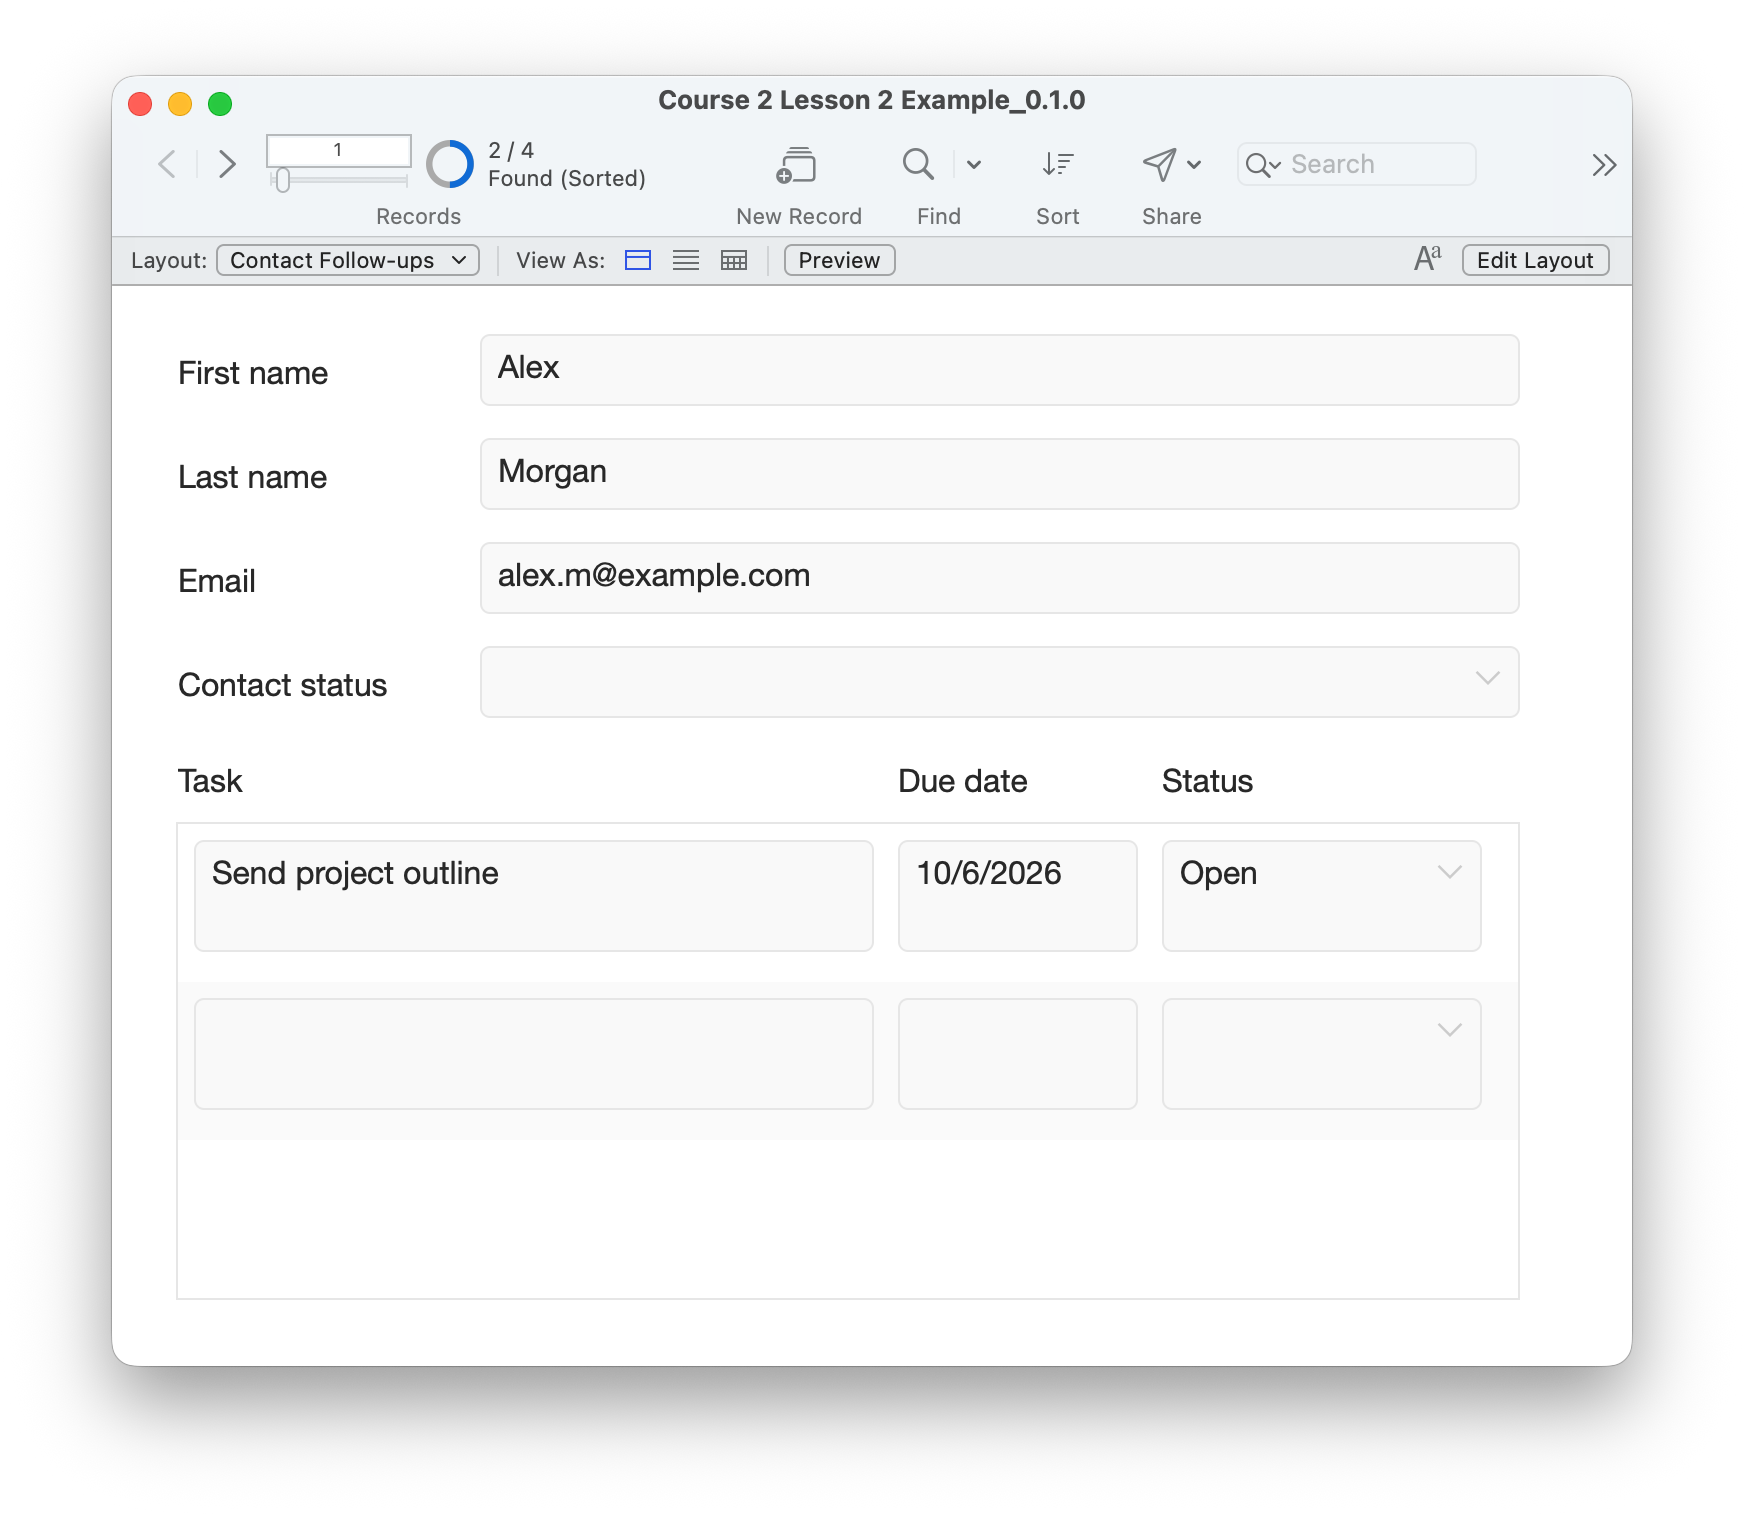
- Switch to Alex Morgan. Enter Send project outline, a date of yesterday, and Open.
- Return to Rivera. Confirm that Rivera has only the two Rivera tasks. Change Send meeting summary to Done. Leave the second task Open.
- Confirm Rivera’s Contact status is still Active and the toolbar contact count has not increased. Check that the original notes remain available on Contact Notes.
- In your practice file, clear an existing task’s description and attempt to commit. Confirm the message appears, then restore the description. Check that an invalid date is rejected and correct it. Leave all tasks valid.
- Close and reopen the file. Confirm the tasks, dates, statuses and contact links persist.
Compare your result
You added three FollowUps records and no Contacts records. Rivera has two tasks, one Done and one Open. Morgan has one Open task due yesterday. Each task has its own PrimaryKey; Rivera’s two tasks share Rivera’s ContactID. The toolbar still counts contacts because that is the layout’s base table.
Compare the two contacts.
These screenshots show the completed practice entries. Dates use month/day/year: 10/7/2026 is 7 October 2026. Choose dates relative to the day you practice. The example download starts with an empty FollowUps table.
Check your understanding.
Choose one answer for every question. Answers and scores stay in this page.
Next: find what needs attention.
Lesson 3 uses dates and status to find open, overdue and upcoming follow-ups. Keep the three practice tasks; they give you useful records to search.
Return to the course outline ↗