Give every note its own record.
Your example
The screenshot below shows a note entered through the portal. In the practice activity, you will add notes, switch contacts and reopen the file to check your work.
Continue your lesson 5 working file. Finish editing, close it and make a backup, then reopen it. Keep the Contacts table, automatic primary keys, Contact Entry layout and New Contact script. The script should select Contact Entry directly, as in the updated lesson 5.
We will add Notes and a separate Contact Notes layout. This keeps the earlier layouts available. Names and emails stay in Contacts; each note gets its own Notes record.
Download example ↓Example 0.1.0 contains the completed relationship and portal. Inspect them instead of adding duplicates. It preserves the lesson 5 scripts and contact records. Notes starts empty, ready for the practice activity. For building along, use your own lesson 5 file. The lesson 5 script selects Contact Entry directly.
STEP 1
Match the person, not the name.
A primary key identifies one record. Contacts::PrimaryKey already generates a unique text ID. Notes needs its own primary key too, plus a field that stores the ID of the contact it belongs to. That second field is a foreign key.
Contacts
PrimaryKey: one unique value per person.
FirstName, LastName, Email.
Notes
PrimaryKey: one unique value per note.
ContactID: the person’s PrimaryKey.
NoteText: what happened.
Contacts::PrimaryKey = Notes::ContactID
Two notes for Alex Rivera share Alex Rivera’s ContactID. Their own PrimaryKey values differ. Alex Morgan has another contact ID, so the notes stay separate even though both people are named Alex. Do not type the illustrative names into ID fields or replace generated primary keys.
STEP 2
Create the Notes table.
- Choose File → Manage → Database, then the Tables tab. Type Notes and click Create.
- In Fields, choose Notes. Keep its five default fields: PrimaryKey, CreationTimestamp, CreatedBy, ModificationTimestamp and ModifiedBy. PrimaryKey should retain its automatic UUID calculation and protection against editing.
- Create ContactID as Text and NoteText as Text. ContactID is a normal stored field with no UUID auto-entry and no unique-value validation. It must be able to repeat across notes.
- Confirm Notes has seven fields. Contacts still has its original eight.
The five default fields are missing
New-table defaults can be turned off or customized. Do not guess key values or enable a unique rule on ContactID. Use this lesson’s example to inspect the seven field definitions, or restore your backup and enable the Add default fields to newly defined tables option in File → File Options before creating Notes again. The example follows FileMaker’s standard five default fields.
We will display only NoteText in the portal. The generated ID and audit fields still exist even when they are not shown.
STEP 3
Connect Contacts to Notes.
- In Manage Database, choose Relationships. Locate the Contacts and Notes boxes. Each box is a table occurrence: a table reference used to define context and relationships.
- Drag Contacts::PrimaryKey onto Notes::ContactID.
- Double-click the line between them. Confirm the match is PrimaryKey = ContactID.
- On the Notes side only, select Allow creation of records in this table via this relationship.
- Leave both Delete related records in this table when a record is deleted in the other table options off. Confirm the relationship and close Manage Database.
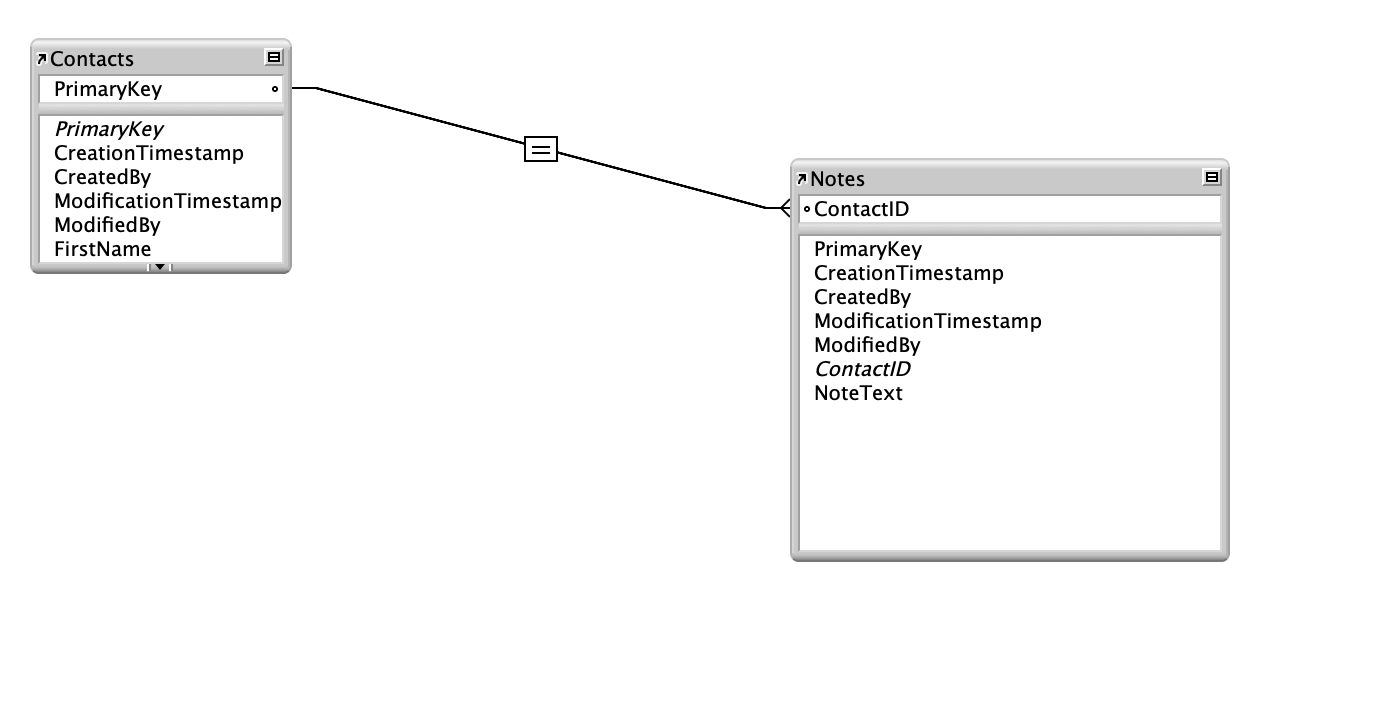
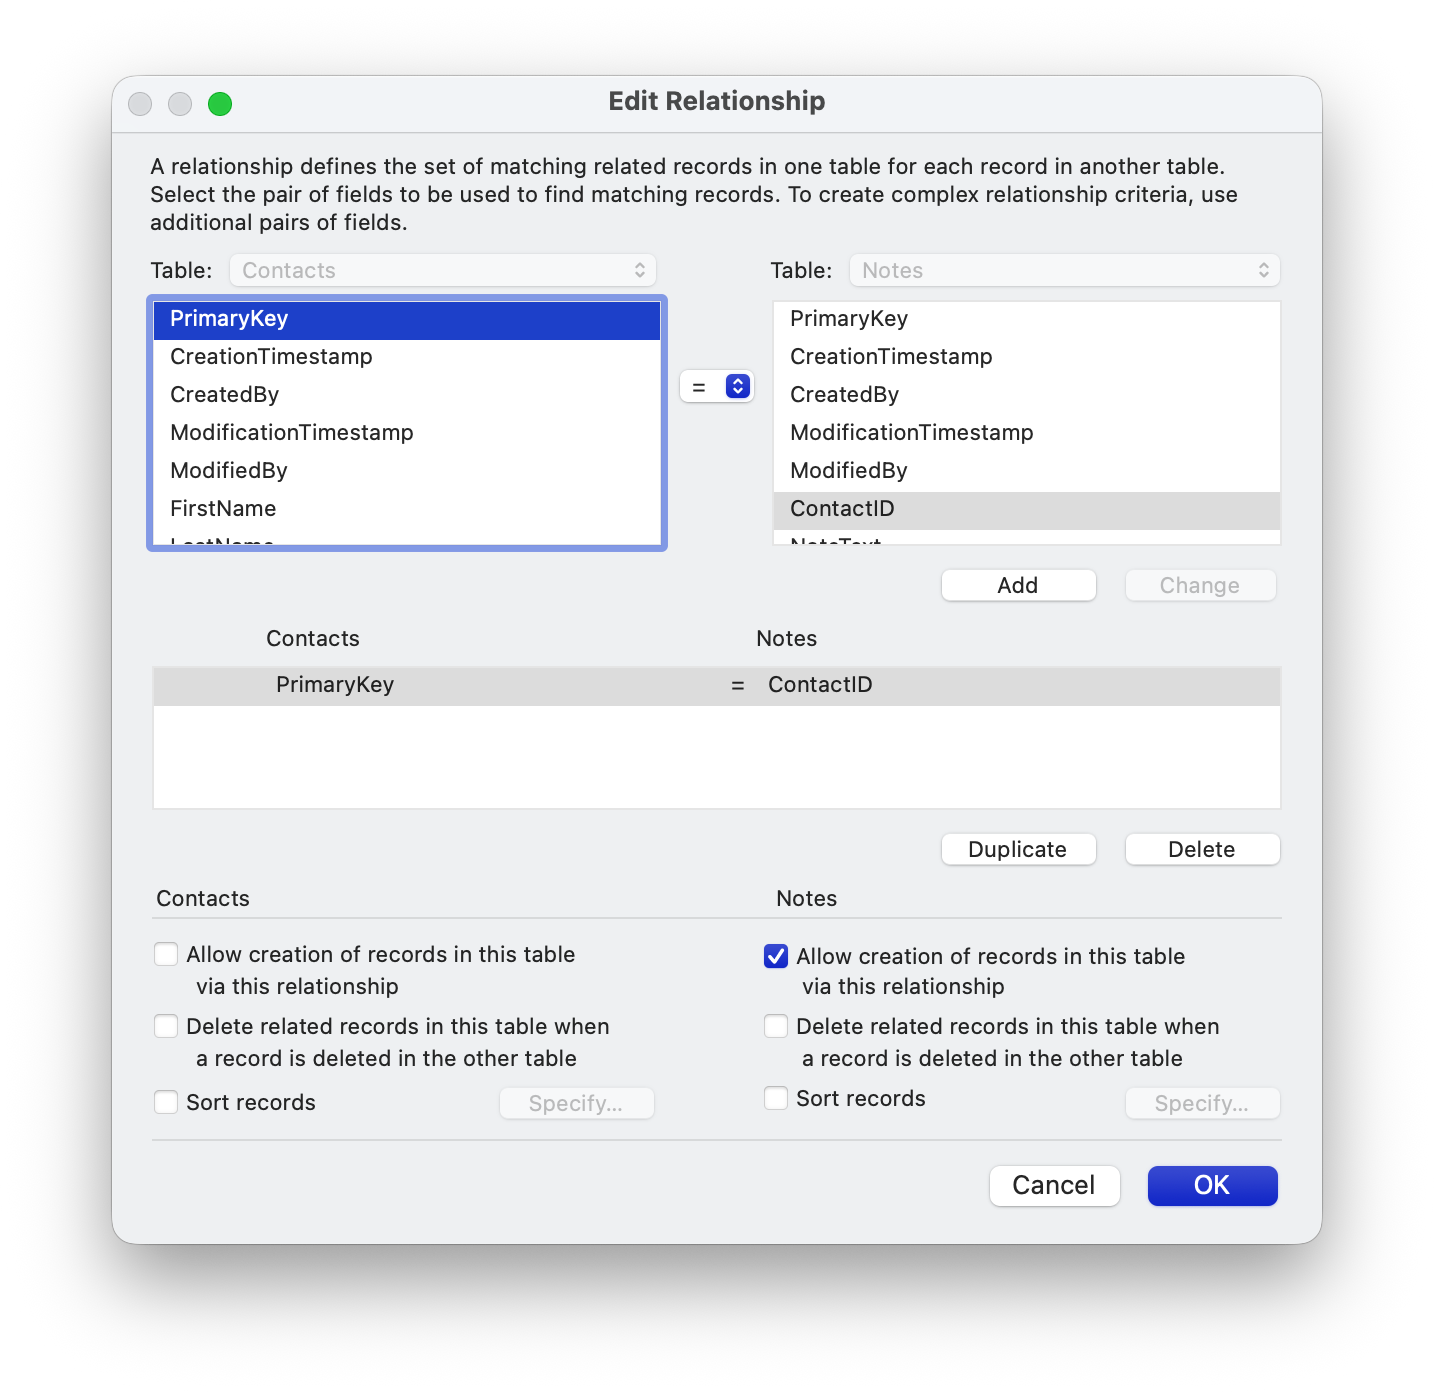
Allow creation makes it possible to enter a note in a blank portal row. FileMaker fills ContactID from the current contact’s PrimaryKey. It does not copy the contact’s name into the note.
This lesson does not enable cascading deletion or teach deleting contacts. With cascade deletion off, deleting a contact can leave its notes without a matching parent. Keep the practice data and do not use deletion as a reset.
STEP 4
Show several notes in a portal.
- Select Contact Entry and enter Layout mode. Choose Layouts → Duplicate Layout; name the copy Contact Notes. Confirm it is based on Contacts. Keep the original Contact Entry layout.
- On the copy, remove the New Contact button layout object to make room. This removes only that button from this copied layout; the original button and scripts remain. Move the three contact fields closer together and leave a clear area below Email.
- Add a text label: Notes — type in the next blank row.
- Select the Portal tool and draw a wide rectangle beneath the label. In Portal Setup, choose Notes for Show records from, with initial row 1 and three rows. Allow vertical scrolling. Leave portal filtering, sorting and deletion off for this exercise.
- Click OK. In Add Fields to Portal, add Notes::NoteText only. Make the field wide and tall enough for a short sentence, fully inside the first portal row.
- Save, return to Browse mode and choose Form View. Use Records → Show All Records.
A portal repeats its first-row objects for the matching notes. A related field placed outside the portal shows only the first related record. If you move the portal in Layout mode, its field should move with it; otherwise the field may not be contained in the portal.
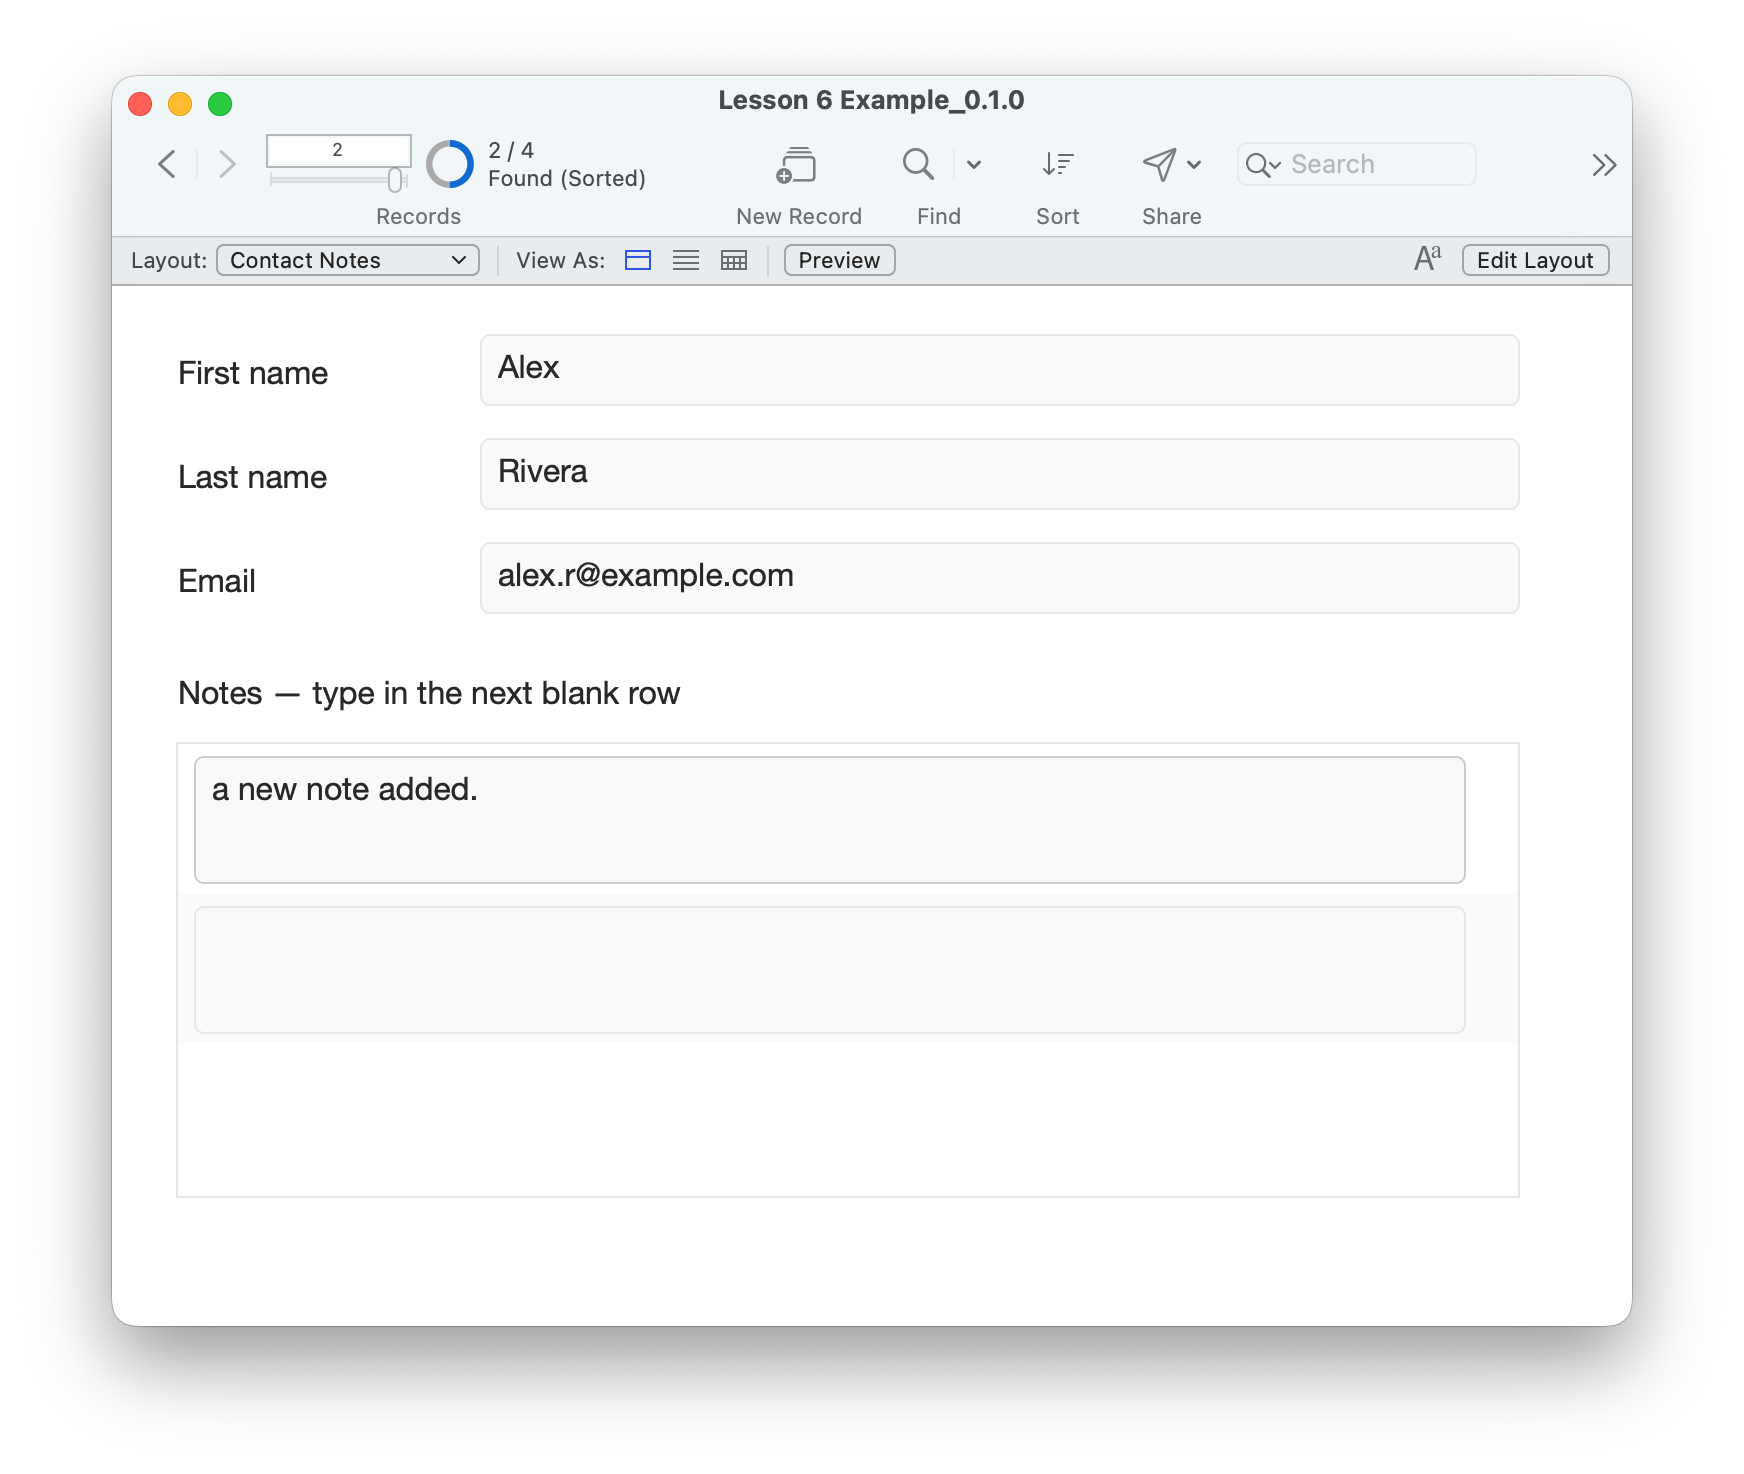
Without a sort order, related records appear in creation order. The blank entry row is not a saved note until you enter data and commit it. The status toolbar counts Contacts records, not the notes shown in the portal.
YOUR TURN / ABOUT TEN MINUTES
Keep the two Alex histories separate.
- In Contact Notes, navigate to Alex Rivera. Check Last name and email: alex.r@example.com.
- In the blank NoteText row, enter Asked for a Friday follow-up. Click a blank area outside the portal to commit. In the next blank row, enter Sent the meeting summary. Commit again.
- Navigate to Alex Morgan, with alex.m@example.com. Rivera’s notes should not appear here. Enter Prefers email updates. and commit.
- Return to Alex Rivera. Confirm the two Rivera notes return and Morgan’s note is absent. The total number of contacts should be unchanged.
- Close and reopen your file, return to Contact Notes and compare both people again.
If the example already contains these three notes, inspect and compare them rather than entering duplicates. Any extra contacts from your earlier practice are fine; note your starting contact total and verify it stays the same.
There is no blank entry row
Check that you are in Browse mode and the current contact exists. In Portal Setup, confirm Notes is selected; in the relationship, confirm Allow creation is enabled on Notes. Scroll to the end if needed. The field must be Notes::NoteText and must sit inside the portal’s first row.
Both Alex contacts show the same notes
Stop entering data and inspect the match fields. Use Contacts::PrimaryKey = Notes::ContactID, not FirstName. Check that Contact Notes is based on Contacts. Do not fix this by renaming people or changing their primary keys.
A QUICK REVIEW
Check your understanding.
Choose one answer per question, then read the explanations and retry.
Answers stay in this page’s memory. No account is needed. We count quiz submissions without collecting answers or scores.
Your foundation project now has a history.
You have worked with tables, fields, records, layouts, finds, sorts, buttons, scripts and a one-to-many relationship. Demonstrate the project: find a contact, open Contact Entry, create a contact with the button, then switch to Contact Notes and add a note.
This is the end of the six-lesson foundation pilot, not a complete FileMaker curriculum. Keep your working file and backups. Write down any questions or unexpected results to discuss with your instructor.
Return to the course outline ↗Further reading
Checked against current Claris Help on 5 October 2026.