Keep your projects and existing tasks.
Continue your saved Course 4 working file after Lesson 1. Close it before making a backup, then work in a copy. FileMaker Pro 26 desktop on macOS is required and sold separately.
The starting download contains Lesson 1 with the three practice projects entered by Plato. The completed example adds one optional FollowUps field, a Projects table occurrence, a relationship and a review layout. It preserves the existing records and leaves every task unassigned. Your own task statuses may differ; do not reset them to match a screenshot.
This lesson prepares the link.
Lesson 3 adds the project chooser and assignment checks. A blank project name is expected today. Do not assign tasks by typing or copying keys manually.
1. Keep two different links.
A task already belongs to a contact through FollowUps::ContactID. It may also belong to one project through the new FollowUps::ProjectID. Several tasks may use the same project key; some tasks may have no project.
| Field | Purpose |
|---|---|
| FollowUps::PrimaryKey | Identifies this task. Keep its existing auto-enter UUID. |
| FollowUps::ContactID | Identifies the task’s contact. Keep the existing relationship. |
| FollowUps::ProjectID | Optionally stores Projects::PrimaryKey for one project. |
| Projects::ContactID | Identifies the project’s owner; it must match the task’s contact for the new relationship. |
A project name is a description, not an identity. Rivera and Morgan can each have Website refresh. The project key selects a specific record; the contact match checks whether that record belongs to the task’s contact.
2. Add one optional Text field.
- Choose File → Manage → Database → Fields and select FollowUps.
- Create ProjectID with type Text. Use ordinary stored, non-global storage with one repetition.
- Leave auto-enter empty. Do not enable Not empty, Unique value or Existing value validation. The field must allow blank values and repeated project keys.
- Keep FollowUps::PrimaryKey and ContactID unchanged. With the previous lessons’ fields, FollowUps now has twelve fields.
Existing records receive no project assignment. Adding the field should not change their contact, task text, date or status.
3. Use another occurrence of Projects.
The graph already links Contacts to Projects and Contacts to FollowUps. A separate occurrence gives the task its own path to Projects without creating a circular path through the existing occurrences.
- On Relationships, choose Add a table. Select the existing Projects table from the current file and name the occurrence ProjectsForTask. Do not create another base table on the Tables tab.
- Drag FollowUps::ProjectID to ProjectsForTask::PrimaryKey.
- Open that relationship. Add a second equality pair: FollowUps::ContactID = ProjectsForTask::ContactID. The dialog must show both rows below.
- Leave Allow creation of records via this relationship and Delete related records off on both sides. Leave relationship sorting off.
- Keep all previous relationships, including Contacts–Projects with project creation enabled, unchanged. Save the definition.
| FollowUps | Comparison | ProjectsForTask |
|---|---|---|
| ProjectID | = | PrimaryKey |
| ContactID | = | ContactID |
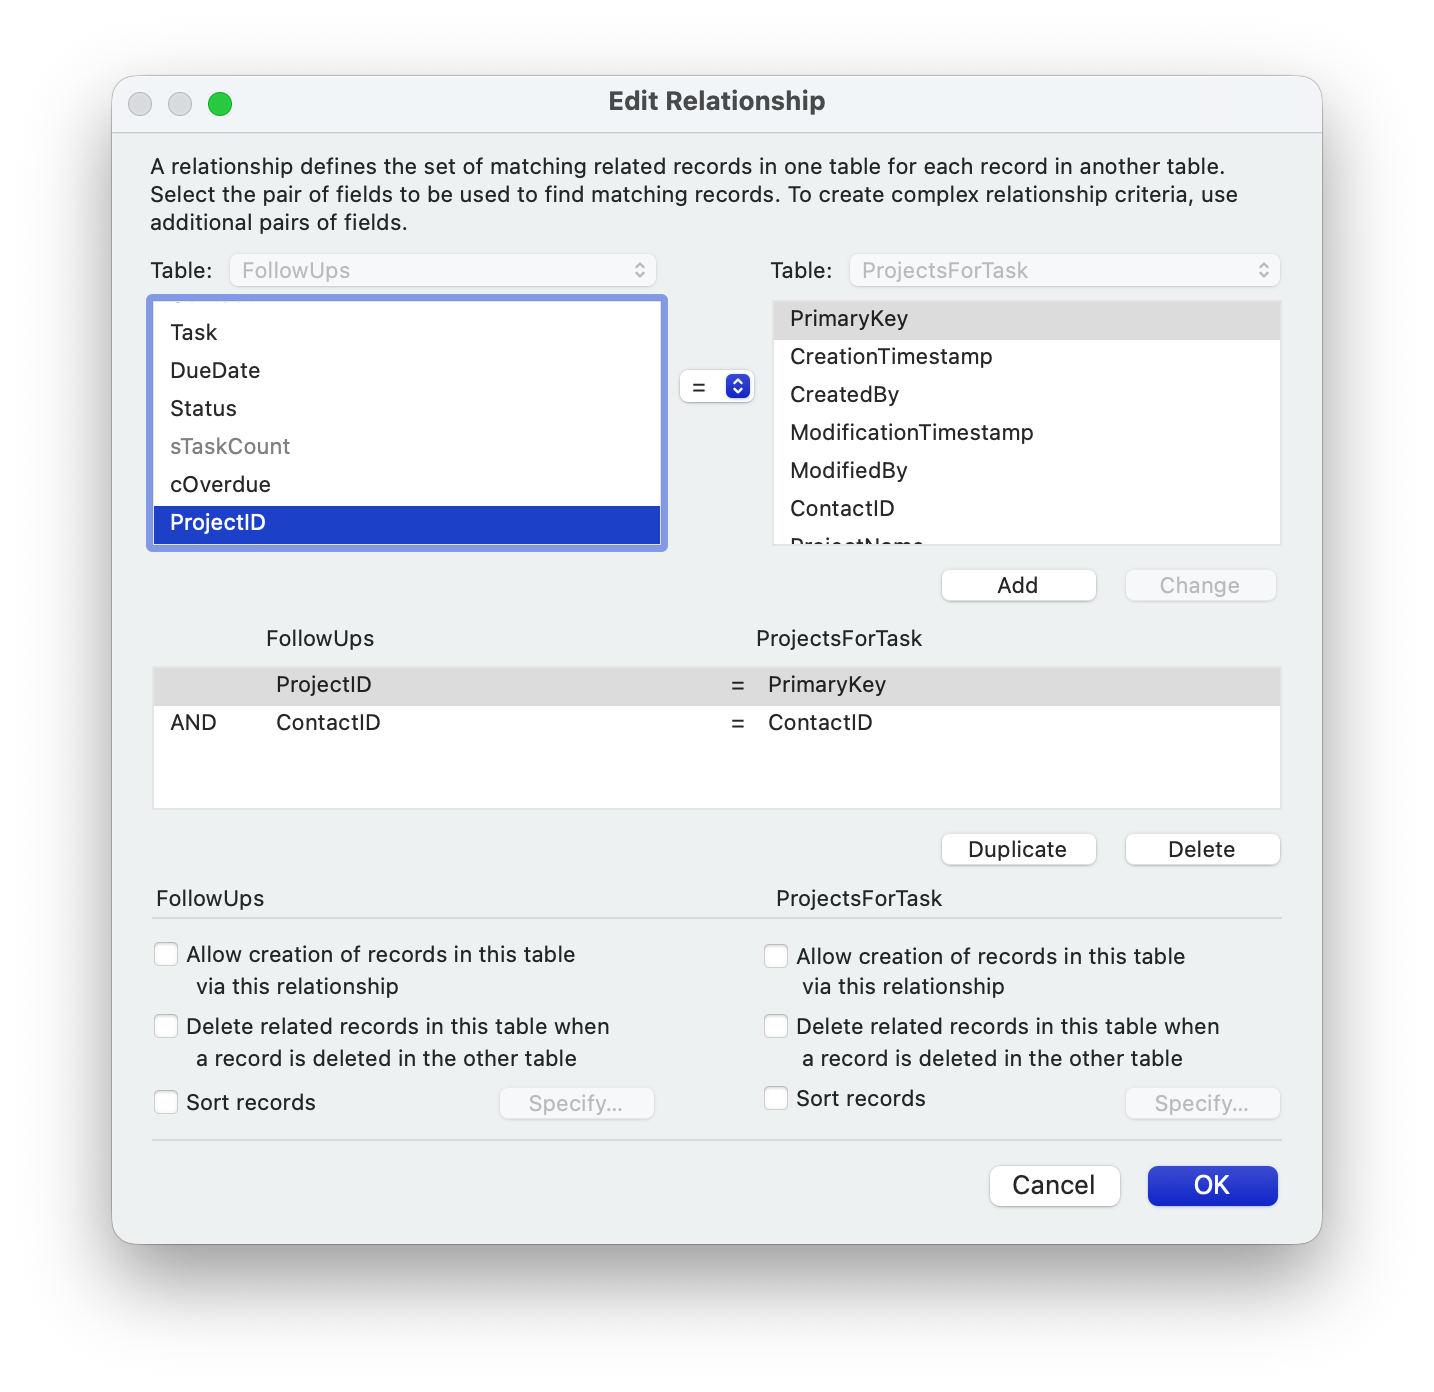
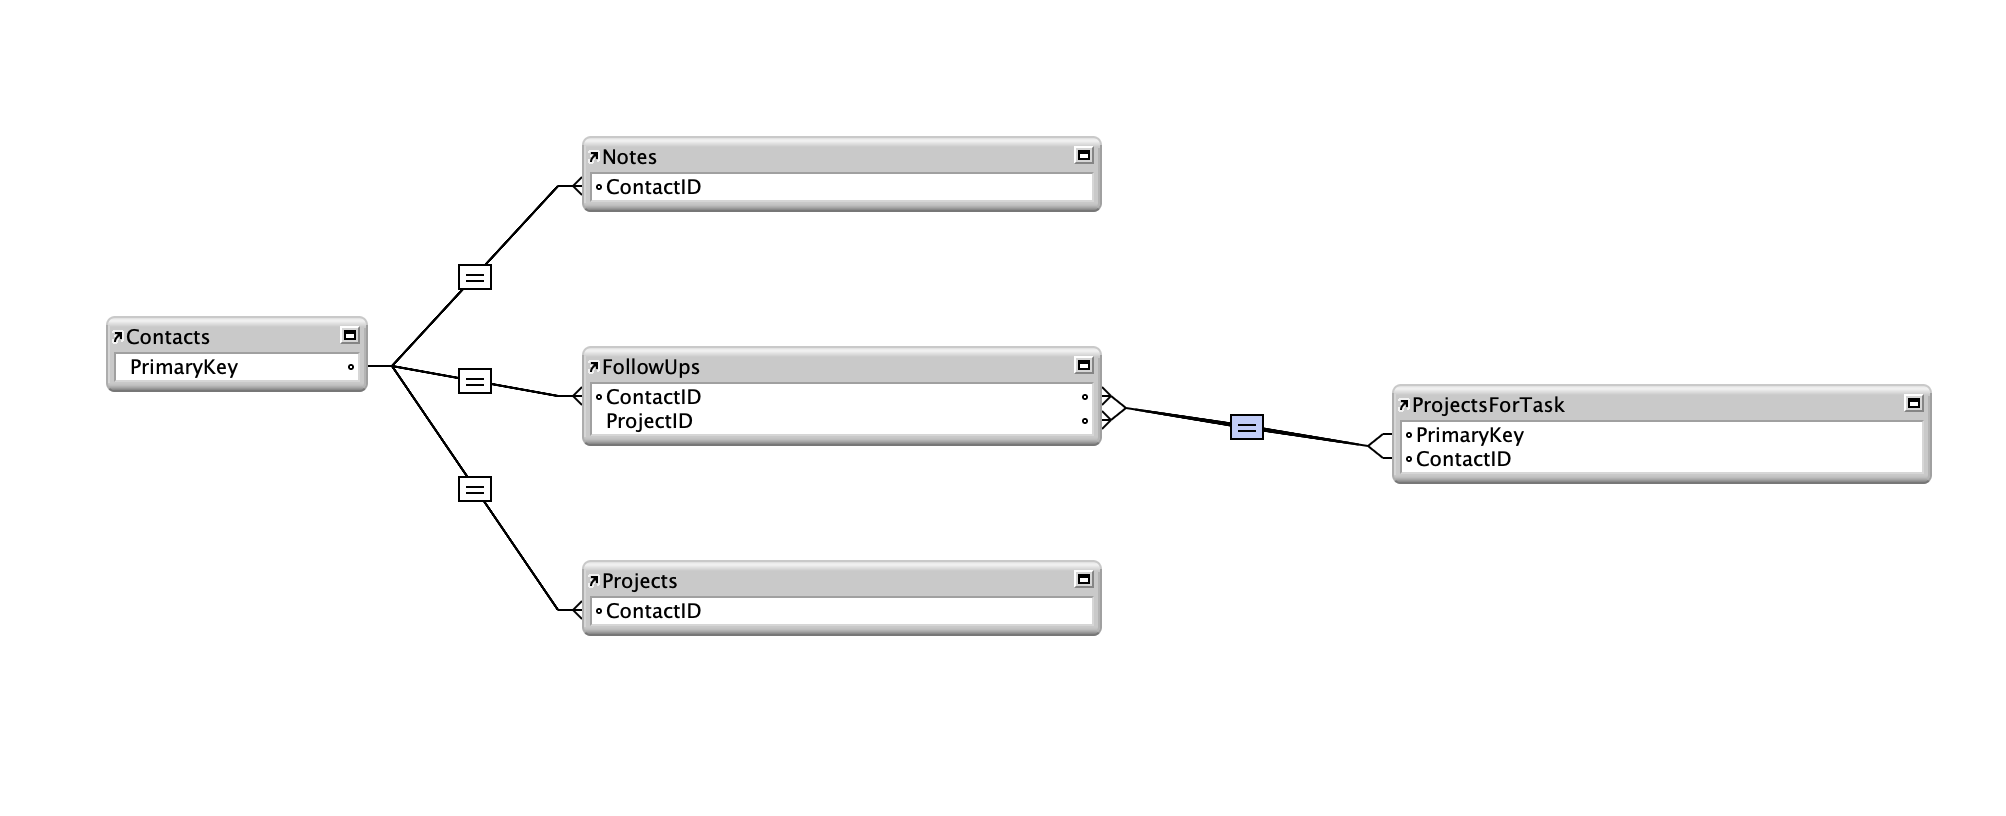
Both comparisons must match. ProjectsForTask uses the same stored records as Projects. It is another occurrence, not another collection of copied projects.
Matching is not assignment validation.
This relationship controls which project is related. It does not reject an arbitrary ProjectID entered elsewhere, prevent every ownership change or provide record-level security. A wrong stored key can produce a blank related name. Lesson 3 adds a contact-limited chooser and checks before saving an assignment.
4. Build a task-based review screen.
- Duplicate Follow-up Overview and name the copy Task Project Links. Keep Show records from: FollowUps in Layout Setup. Keep the original layout.
- On the copy, remove the navigation and Open tasks / All tasks buttons from the Header, and the Open contact button and Overdue indicator from the Body. Their existing scripts were written for the original screens.
- Keep the task count, First name, Last name, Task, Due date and Status displays. Change the title to Task Project Links. Add the header note Project names appear after assignment in Lesson 3.
- In the Body, add a label Project and an edit-box field bound to ProjectsForTask::ProjectName below the Task field. Use enough height and width for the name. Keep it entirely inside the Body; it repeats once per task.
- Select the displayed fields on this copy. In Inspector → Data → Behavior → Field entry, turn off Browse mode and Find mode entry. In versions that show an entry choice, select View Only for both. This is a read-only review screen, including the related project name: typing there must not rename a project.
- Save the layout. Enter Browse mode, choose List View, and use Show All. Use the Layout menu to return to your contact or task-entry screens.
Do not place a free-text ProjectID box on this screen. Displaying a related name and storing a foreign key are different jobs; the chooser will handle the latter in Lesson 3.
Verify the structure without assigning work.
- Open Contact Projects and confirm Rivera still has Website refresh and Autumn workshop, and Morgan has a separate Website refresh. If you used different practice data, compare with your own Lesson 1 file.
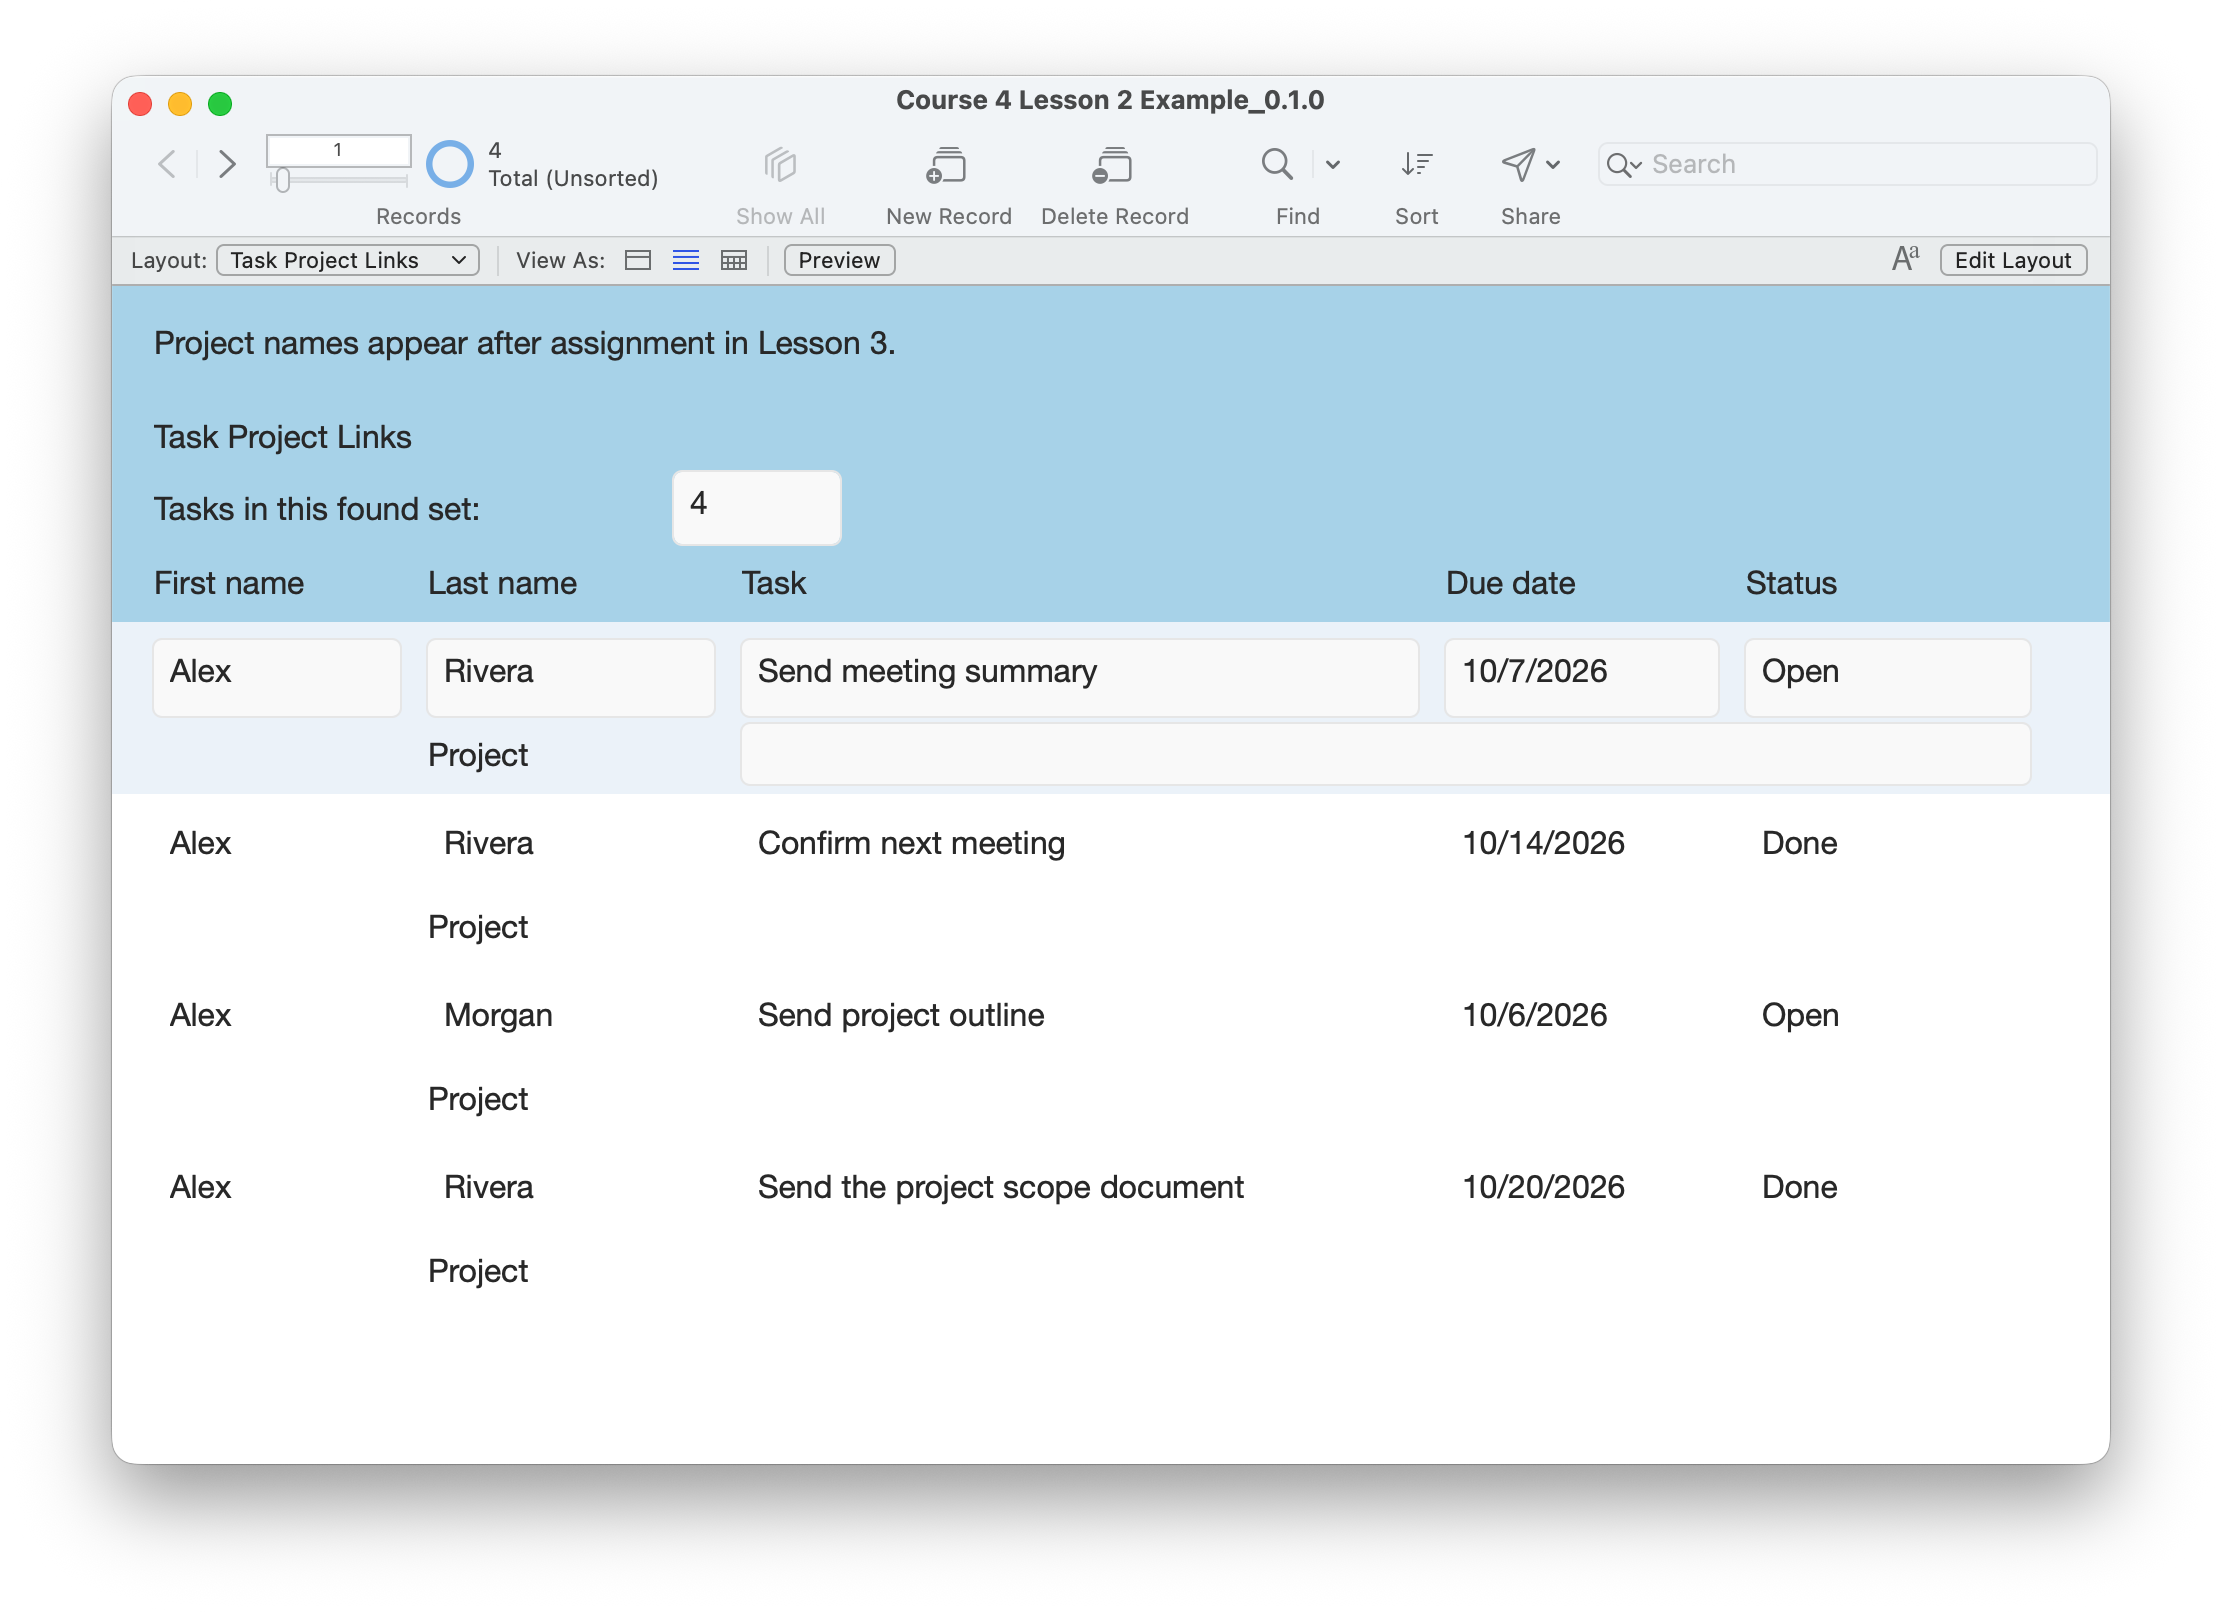
- Open Task Project Links from the Layout menu. Use Browse mode, List View and Show All. The supplied file should contain the same four tasks as the starting file. The toolbar and summary count tasks on this layout.
- Confirm every task still has its original contact, due date and status. Project names should be blank: no existing task was assigned automatically. Try clicking a displayed field; this review layout should not allow editing.
- Open Manage Database → Relationships. Open the FollowUps–ProjectsForTask relationship. Confirm both field pairs use = and both creation/deletion options are off. Cancel out after inspecting.
- Explain the three cases below without editing live keys. Do not type project names or guessed IDs into ProjectID.
- Use the Layout menu to return to Contact Task Views and Contact Projects. Check that your previous task controls and project lists still work. Save, close and reopen; confirm your data and the new Task Project Links layout remain.
| Task link | Expected related project |
|---|---|
| Blank ProjectID | No match; the task remains unassigned. |
| Rivera task, Rivera project’s key, matching ContactID | The selected Rivera project’s name. |
| Rivera task, Morgan project’s key | No match because the contact IDs differ, even if both projects are called Website refresh. |
Compare your result
The same tasks and contact-specific projects remain. Task Project Links shows task records and blank project names. ProjectsForTask is an occurrence of Projects, and its relationship has two equality pairs with creation and deletion off. This completes the groundwork; assignment is deliberately left for Lesson 3.
If a project name is unexpectedly blank after a future assignment, inspect both key matches. A blank display alone cannot distinguish an unassigned task from an invalid key.
Check your understanding.
Choose one answer for every question. Answers and scores stay in this page.
Next: choose names, store IDs.
Lesson 3 adds a contact-limited project chooser, stores the selected key, and lets you clear a task’s optional assignment. Keep this saved working file.
Continue to Lesson 3 ↗