Keep the working app and add a report.
Save and close your Lesson 5 working file, then make a backup. Continue in a copy with your current tasks and statuses. Keep Follow-up Overview and Contact Actions.
The starting download preserves the latest Lesson 5 project. The completed example adds a compact Follow-up Report layout using the same FollowUps table and sTaskCount summary. It does not change task data or contain a pre-exported PDF. Paper settings and final output are part of the exercise.
Your outcome
A report showing selected tasks, contact names, dates, statuses and a count. You will export both an all-task report and an Open-task report, then inspect the saved files.
1. Design for the page.
- Duplicate Follow-up Overview as Follow-up Report. Keep it based on FollowUps. Use List View.
- In the Header, change the title to Follow-up Report. Keep the label Tasks in this found set: and sTaskCount so the count is accurate for any search.
- Choose File → Page Setup. Select A4 or US Letter, Landscape, and 100% scale. Use the paper size you intend to export or print.
- In Layout Setup’s Printing options, use fixed margins of 0.5 inch (36 points) on each side. Keep single-column printing. Paper and printer settings can affect the printable area; inspect the page boundary guides.
- Make the layout approximately 700 points wide. Arrange first name, last name, task, due date and status within that width. Use about 12-point body text and a larger report title. Allow two lines for task descriptions.
- Keep column labels in the Header and fields in a compact Body. Use dark text and a plain light background. Remove unnecessary field borders if they make the printed report busy.
- Keep the report free of action buttons. Save and return to Browse mode. The original overview retains its screen-oriented design.
The completed example supplies the compact layout. Confirm your Page Setup and margins before exporting. A wide screen layout does not automatically fit a sheet of paper. Do not reduce text to an unreadable size just to force it onto a page.
2. Choose the report’s contents.
- On Follow-up Report, choose Show All Records. Compare the Header count with the toolbar’s total.
- Sort DueDate ascending, then Task ascending. This will be your all-task report.
- After saving that report, return to Browse mode and find Open in Status. Sort again if needed. This will be your unfinished-work report.
Your counts depend on the tasks you created and completed. Read the records as well as the count. If no Open tasks match, review the find or use a practice task with Status Open; do not export the previous found set and label it Open.
The title stays general because the layout can show several scopes. Give the exported file a descriptive name such as Follow-ups-All-2026-10-07.pdf or Follow-ups-Open-2026-10-07.pdf, replacing the date with your export date.
3. Inspect the pages before saving.
- With the intended found set and sort active, click Preview.
- Check the complete page width. First and last names, task text, four-digit-year dates and Status must all be visible. Confirm the count describes the found set.
- Use the page navigation controls to inspect every page. In Preview, these controls navigate pages rather than the Browse-mode record list.
- Look for clipped text, empty overflow pages, rows cut awkwardly across pages and missing column headings.
- If something is clipped, return to Layout mode, adjust the field width or Body height, save and preview again. For long task text, give the field more height; fixed-height fields do not automatically show unlimited text.
Preview is for checking output, not editing records. Change task data in Browse mode. The PDF will use the layout you are viewing, so select Follow-up Report before saving.
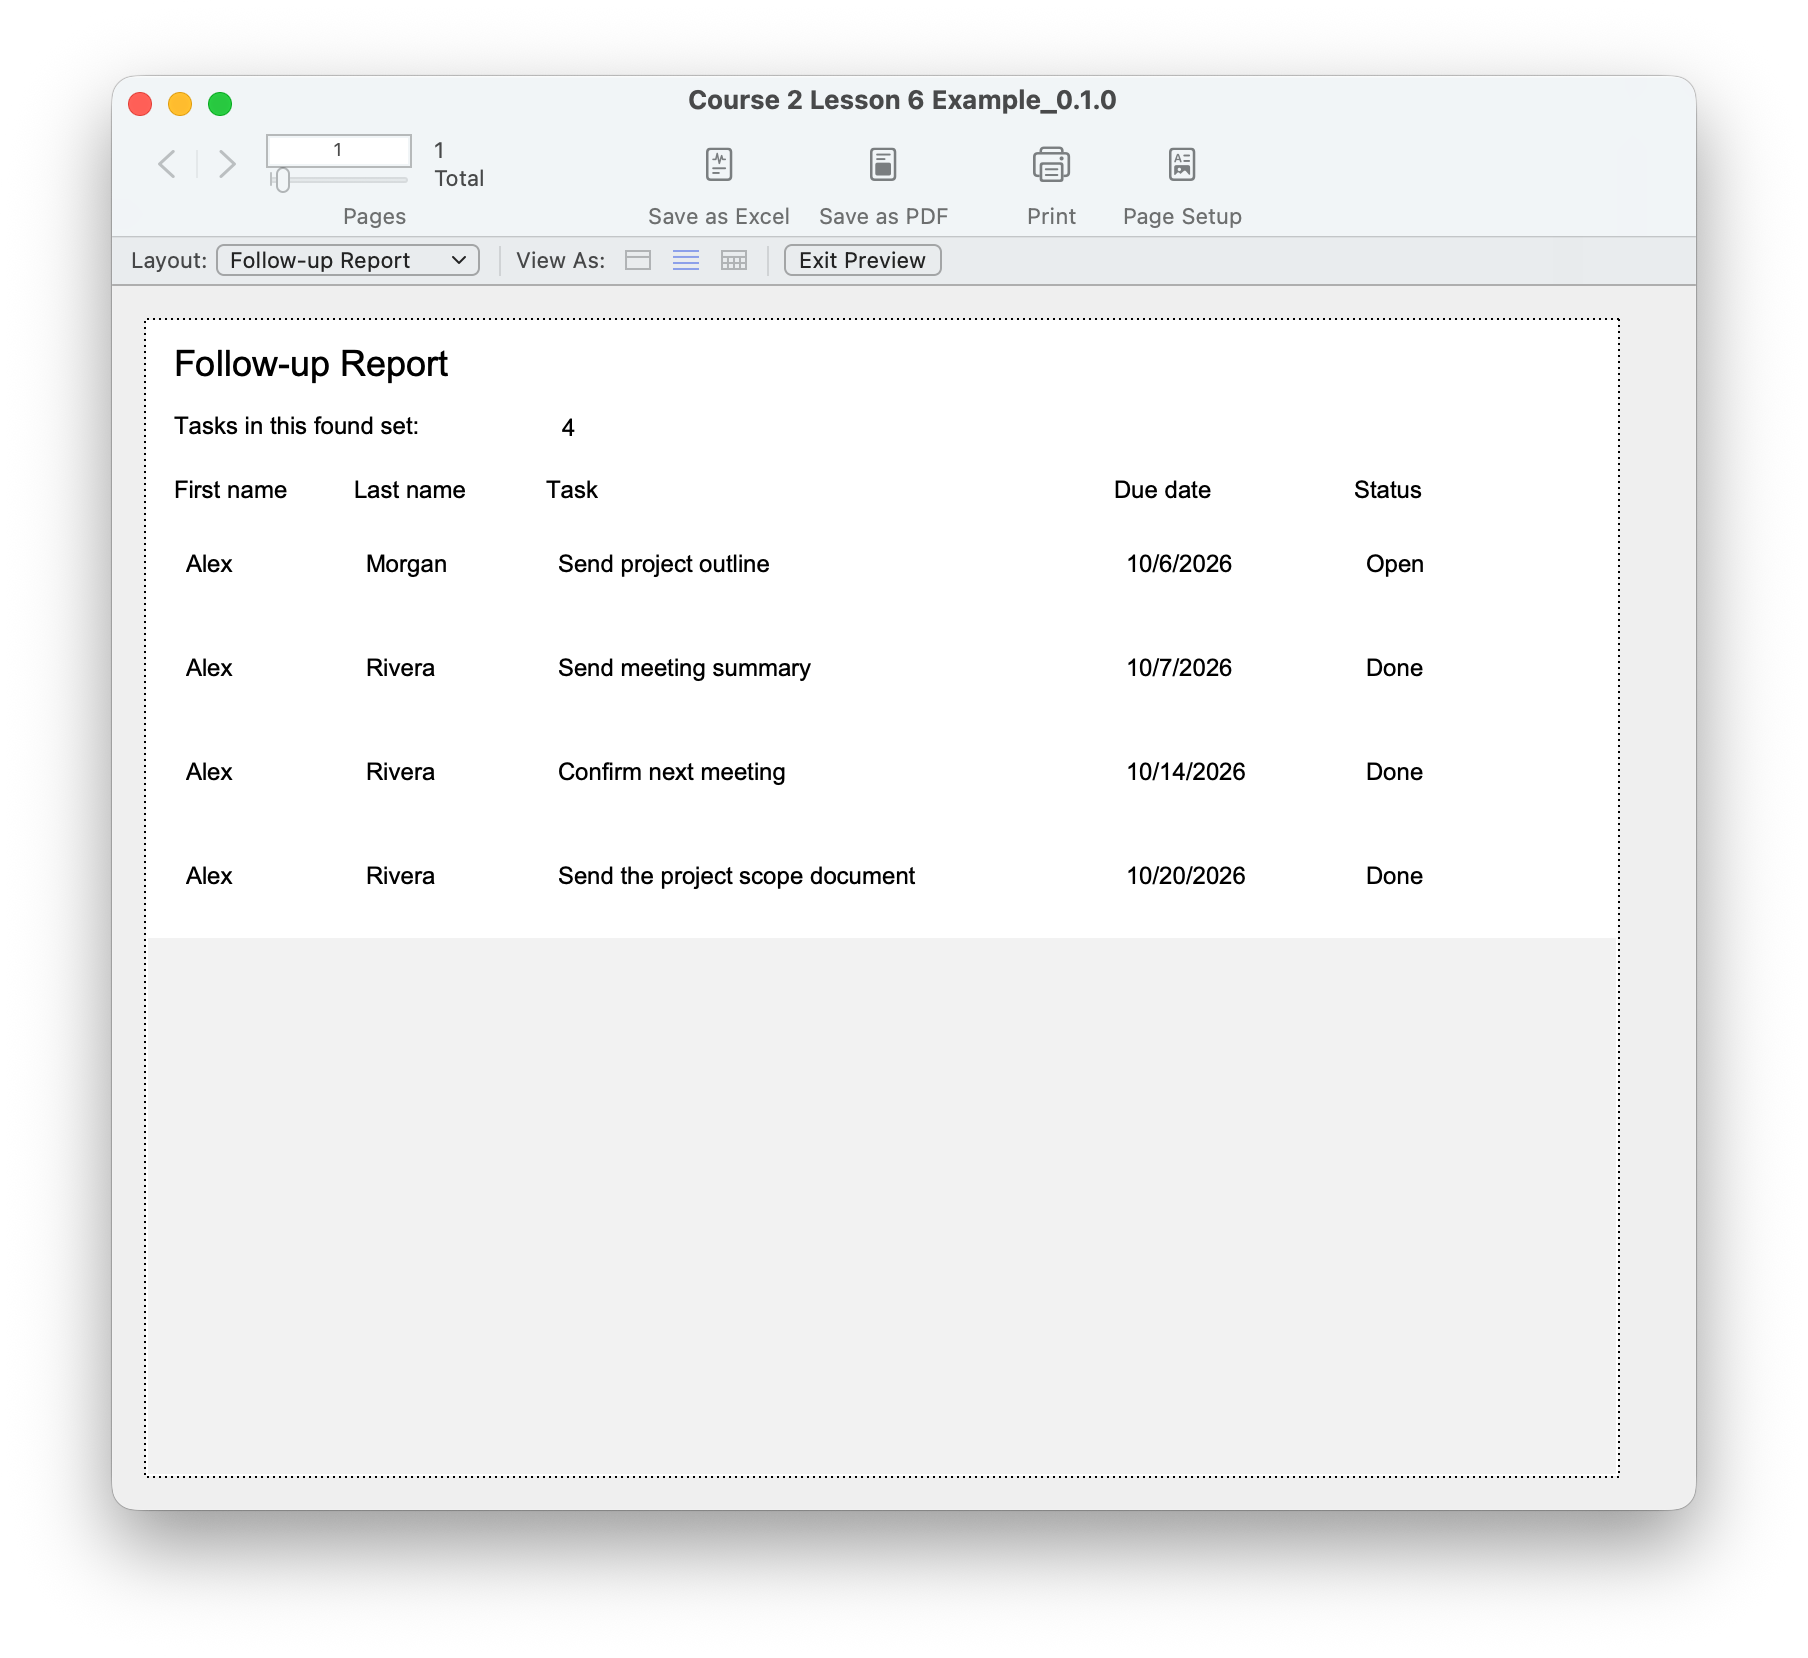
4. Save the whole found set.
- In Preview mode, click Save as PDF. Alternatively, in Browse mode choose File → Save/Send Records As → PDF.
- Choose a local destination and a clear filename. In the Save options choose Records being browsed, not Current record or Blank record.
- Save the PDF. Open the actual saved file and inspect every page, including the first and last task and the summary count.
- Return to Browse mode, find Open tasks, sort by DueDate then Task, preview, and export a second PDF with Open in its filename. Confirm no Done tasks appear in it.
For a paper copy, use File → Print and choose Records being browsed in FileMaker’s print options. Check the same paper orientation and scope before sending it to the printer. Printing is optional for this lesson.
A PDF is a snapshot. Later changes in FileMaker do not update it, and the PDF cannot replace your editable database backup. Export a new file when the task list changes.
Finish the follow-up app.
In a practice copy, walk through the full project and explain what each part contributes:
- On Contact Details, add a fictional contact with a first name, last name, example.com email and Active status. Correct any validation messages.
- On Contact Notes, add a note for that contact. Confirm it stays separate from another contact’s notes.
- On Contact Actions, use New follow-up to enter two tasks with valid due dates and Open status. Mark one Done. Confirm only the intended task changed.
- On Follow-up Overview, find Open, sort by due date and compare the summary with the matching tasks. Verify the new contact’s remaining task is present.
- On Follow-up Report, repeat the intended find and sort, preview every page, then export Records being browsed. Open the PDF and confirm the completed task is excluded.
- Save and close the FileMaker file. Reopen it and confirm the contact, note, task links and statuses persist. Retain the database and PDF as separate artifacts.
Compare your result
The app stores contacts, notes and tasks in separate related tables. Validation checks entry; buttons guide actions; finds choose records; sorting orders them; a summary counts the found set; the report packages that selection for reading outside FileMaker.
Check your understanding.
Choose one answer for every question. Answers and scores stay in this page.
You have built a practical follow-up app.
After completing the exercises, you can connect contacts to tasks, guide data entry, complete work, find what remains and produce a readable report. Keep your working file and backups.
This course covers local FileMaker Pro desktop development. Sharing a production app, access control, deployment and multi-user operation need their own design and testing.
Review the course ↗